Now that I have one post under my belt, I decided to make something that I was pretty sure would turn out. Bread. I love bread. I love the smell of the yeast, the feel of the dough in my hands and most importantly...the taste. I originally got this recipe while I was working in the kitchen at a curling rink. Although I never stop trying new recipes for dinner buns, I always come back to this one. It consistently delivers a beautiful, soft and delicious bun. I have also used this recipe to make cinnamon buns with great results. This time around I did take lots of pictures and I hope it helps anyone who is scared to try making bread. Enjoy!
Recipe:
1 1/2 cups warm milk 2 eggs, slightly beaten
1 1/2 cups warm water 1/3 cup oil
1/3 cup sugar 2 1/4 tsp yeast
1 tsp salt 5-6 cups flour
Method:
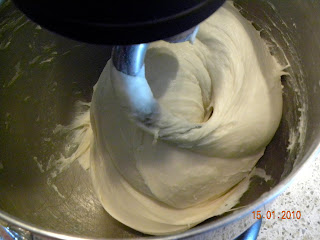
I will first start by saying that the yeast that I use is meant to be mixed in with the flour and not started with the water like most recipe. Began by combining the warm milk and water with the sugar in the bottom of your mixer bowl. I usually give this a little stir just to slightly dissolve the sugar. Add the oil and beaten eggs and give this another quick stir. I then add the flour. This is a really important step actually. When ever I make bread, I always hold back about 1 cup of flour. You just never know how much flour your dough will take on the given day. It is simple to add more flour if needed. Now because of the yeast I use, I sprinkle it over the flour and then with my dough hook in place, I start on a low speed to begin to combine the flour and wet ingredients. When the flour has been moistened, add the salt and turn your mixer up to about 6 ( I know this is probably not recommended but it's what I do) . You will be able to tell right away if you will need more flour. Add as needed but no more than 1/4 cup at a time. The kneading process will take up to 8 min, even with a mixer. Don't rush the flour. You want your dough to be a little loose and sticky for at least 5 min. Look for the dough to kind of mound in the center of the bowl but still stick to the sides. At about 5 min, the dough should start to pull away from the sides a little and form even more of a ball. If this isn't happening after 5 min....add more flour. Eventually what you are looking for is the dough to completely pull away from the sides of the bowl and almost leave it looking clean. Rub your hands with about a tbsp of butter, pick up the soft and slightly sticky dough and rub it with butter. Place it back int he bowl. Cover the bowl with a tea towel or plastic wrap. Let the dough rise until almost double. This could take 1 -2 hours. It really depends on the temperature of your room. You can check your dough by sticking your finger into it. If after 5 min of poking it, the hole from your finger has filled, it could probably be given 30 min. more rising. If after the 5 min, the hole is still there, you are ready to form your buns. I use a scale to weight my dough to ensure a uniform size, but you certainly don't need to do this. Shape the pieces dough into balls. Try to make sure the top of the balls are smooth, as they will bake up exactly as they look now. I use parchment paper on my baking sheets. It guarantees easy clean up! How closely you space your bins is up to you. If you are looking for buns that you have to tear apart, then keep them quite close...even just touching. If you want individual ones, obviously space them further apart. Once all of the balls are shaped, cover your tray with plastic wrap or a dry tea towel. Allow them to rise again for about an hour. When they have almost doubled in size, bake them at 350 for about 20-25min. When they are done, they should be nicely browned on the top and a little on the bottom. I like to brush the tops with butter, but it's not necessary. I always move them to a rack to cool. Try to resist eating them immediately, but I bet you can't!
Friday, January 15, 2010
Subscribe to:
Post Comments (Atom)


No comments:
Post a Comment