Wednesday, January 20, 2010

Breaded Pork Chops


This is one of our kids favorite meals, and mine too actually. I usually don't have much luck with pork chops for some reason. I usually overcook them. I can cook a tenderloin, but hand be a pork chop and I will hand you back a dry, white piece of "meat". Am I all alone here? I guess that is one of the reasons I like this recipe so much...Never dried out! I hope your like it too.

Recipe:

1 1/2 cup bread crumbs                                      2 eggs
1/4 cup Parmesan cheese                                    1 cup of flour
pepper                                                                 4 pork chops
1/4 tsp garlic powder
1/8 cup chopped parsley (or dried)
I like some seasoning salt as well, but it depends on the type of Parmesan cheese you use....If you shake it from a can, which I don't recommend, then I would be careful about adding more salt.
 I had very thick pork chops so cot them in half horizontally first so I had less pounding to do. I like to use a Ziploc bag to pound them in. Many people use saran wrap or wax paper to cover the meat, but I like the bag because there is no mess to clean up after pounding.


Working with one chop at a time, using a meat tenderizer or a rolling pin, pound the meat until it is about an 8th of an inch thick. Continue until all of the chops have been pounded.

You will need three containers for the breading. In one container, lightly beat 2 eggs with about 1 tbsp of water and set aside.


In another container, combine the bread crumbs, pepper, cheese, garlic powder and parsley. Mix

In the last container, combine the flour with some salt and pepper.


I like to set up a little assembly line for myself with a tray near buy to put the breaded chops on.
This can be done in earlier and left until ready for dinner.


Dip the chop into the flour and shake off any excess flour. Dip into the egg wash and then into the breadcrumbs. Once you are ready to cook the chops, be sure that the rest of your dinner is ready. These only take a few minutes to cook because they are so thin and after being cooked, they don't hold that well. If you really needed to, you could put them in the oven to hold.
I didn't get a picture of them cooking...How did that happen you ask? I guess between cooking the side dish,  getting my daughter  ready for her dance class, and yelling at least three times for my oldest son to set the table, I thought I did get a picture.  Where is my head?!
Anyway, heat about a tbsp of oil and 1 tbsp of butter in a pan. I use both because the butter on it's own would burn quickly. The addition of the oil allows the butter to be at a higher temp.Once the butter starts to bubble, add the chops. Make sure not to crowd them as this might make them actually steam instead of fry. There needs to be enough room for the liquid to evaporate. All you are really looking for is to see a nice golden brown. Because they are so thin once you get this golden brown you can flip them and do the same for the other side. Continue until all of the chops are done. You may need to add more oil and butter depending on how many chops you are cooking.


I served mine with some orzo with yellow peppers, finely chopped mushrooms, green onion and garlic butter.
I know I need some more color on this plate but it wasn't in the cards (or in the fridge)
It was still delicious.

It is also great topped with marinara sauce and  mozzarella cheese.

Tuesday, January 19, 2010

"Quick" Danish Pastry


Well call me crazy, but I'm feeling inspired. This weekend I caught an episode of Baking with Julia (that would be Julia Child of course) and she was making puff pastry. I have made puff pastry a couple of times before and it turned out quite well, but my God it takes lots of time. It did remind me of a recipe by Nigella Lawson in her book How To Be A Domestic Goddess. It is made in the food processor to speed things up and now being a mother of three, that sounded good to me. My husband had been asking me to make something with almonds so I decided to use Nigella's recipe for her almond filling in half of the danish and make a little apple filling in the other half. If anyone has cooked from any of  Nigella's cookbooks before, you will know that all of the ingredients are measured using the imperial system, so unless you have a scale you will need to find a conversion chart online. Here goes nothing!
                   WARNING: THIS DOUGH NEEDS TO BE REFRIGERATED OVERNIGHT
Recipe:

60 ml warm water                                            1 tsp salt
125 ml milk, at room temp.                              25g sugar
1 large egg at room temp.                                 250g unsalted butter, cold & cut into cubes
350g white bread flour                                    
1 pkg yeast


Pour the water and milk into a small bowl and add the egg, beating lightly with a fork. Set this aside for now.


Put the flour, sugar, yeast and salt into the food processor. Give it a quick pulse to lightly combine.

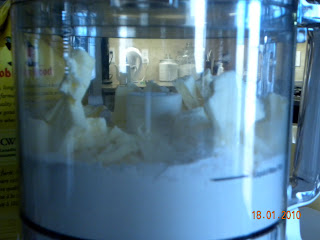
Add the butter and process briefly so that the butter is cut up but still in visible chunks...Like this:


Empty the contents into another bowl and add the milk water and egg mixture. Use your hands or a spatula to fold the ingredients together. Don't overdue it! Expect this to be a gooey mess with chunks of butter still through out it. Cover the bowl with plastic wrap and refrigerate overnight.                                                                                        
The next day............
Remove the pastry from the fridge and turn it out onto a floured surface. Nigella does not tell you to use flour at all, but I can't see this dough not           sticking without it.  Let the dough come to room temperature.                                                         


Roll out the pastry to a 50 x 50cm square. I found it a little difficult to get a perfect square, but I tried.


Fold the dough into thirds, like a business letter.


Roll out the dough again into a 50 x50cm square and then repeat the folding and rolling out 3 times...I know, Ugh.


Refrigerate the dough for 30 min. In the mean time, prepare the filling of your choice. Like I said, I followed Nigella's recipe for the almond filling:
150g blanched almonds
80g icing sugar
2 tbsp unsalted room temp butter
1/2 tsp almond extract
1 large egg white
Process the almonds and icing sugar until finely ground. I used my mini processor and I know it didn't do get the almonds fine enough, so I would pull out the big guns next time. Add the butter and pulse again and then add the almond extract and 2 tbsp of the egg white. ( I saved the little remaining and the yolk for the egg wash later) This will be enough filling for half of the dough. You can at this point refrigerate or freeze the remaining half. I wanted to be done with this so I  made some apple filling for the kids. I just diced up some apples and cooked them in some brown sugar, lemon zest, butter and a little cream.


At this point the book gave little guidance or at least not enough for me. I will tell what I learned from my mistakes...and there were many.

Roll out half of the dough into a square about 30 x 30cm. I am guessing at this size because the recipe just didn't say. Cut the dough into 9 equal squares. It is worth it to make sure they are squares when it comes to the finished product. I didn't take the time to do this and I regret it now. Take about 1 tbsp of almond filling, shape it into a log and place it diagonally across the square of dough. Bring up opposite corners of the dough and pinch them together. Slightly flatten the danish. Place the finished Danish onto a baking sheet. I lined mine with parchment paper. I continued this process with apple filling, but I brought all of the corners to the middle and pinched them together. I wanted the apple to look a little different from the almond danish.


I will warn you now...they ain't pretty.
With the left over egg yolk and white from the almond filling recipe, add 2 tbsp of milk and mix. Brush the danish with the egg wash and let them rise for about 1 hour. Don't look for them to "double" in size because they won't. They will become a little puffy and the dough will just be softer to the touch. I also sprinkled the almond danish with slivered almonds in an attempt to make them look more attractive.


After you feel the dough has "risen" enough, bake them in a 350 degree oven. When I looked for the conversion of 180 C, I got 356 degrees. I really felt that the oven should have been hotter.  The directions are to bake these for 15 min or until golden brown. This took about 25 min. I was getting worried and pulled them out. I should have let them get a little darker as I don't think the middle were as flaky as they should have been.


I really wanted to cry when these came out of the oven. I wanted an oooh...ahhhhhh, or a "I can't believe that you made those yourself!" But you really really could believe these were homemade. They completely opened up in the oven. They were little puffy ...... things. On the bright side...they did taste good.
Nigella calls for a them to be glazed twice, once with a clear glaze while they are hot:
100g sugar
60ml water
and then when the danish have cooled with:
100g icing sugar
                                                                                     1-2 tbsp warm water
I did not have the heart to glaze these little guys. They had gone through enough already. Would I make these again? Yes I think I would. I have learned a lot from my mistakes and they did taste good!

Monday, January 18, 2010

Casssic Bran Muffins


Well it's Monday and I feel exactly like Monday sounds. I feel like there is a long week ahead of me. I needed something to make for the kids snack so I decided that I would go to old reliable. Muffins. I love me a good muffin, and thankfully so do my kids. I found this recipe from All Recipes and it really is great. The original recipe called for * buttermilk, but I did not have any on hand so I substituted milk with 1 tsp of lemon juice. I hope you make them for your family.

Recipe:

1 1/2 cups wheat bran                               1/2 tsp vanilla extract
1 cup buttermilk*                                     1cup flour
1/3 cup vegetable oil                                1 tsp baking soda
1 egg                                                         1 tsp baking powder
2/3 cup brown sugar                                 1/2 tsp salt


Method:


In a med bowl, combine bran and buttermilk and let stand for 5 min. In a small bowl mix the sugar, oil, egg and vanilla.


Add the sugar oil mixture to the bran and buttermilk. Mix with a spatula.


In yet another bowl, sift together the flour, salt baking powder and baking soda. As you can see, I hate sifting, so I just use a whisk. Because I can.

Oh ya, I added mini chocolate chips just because I can as well.

Add the flour and chocolate chips and stir until just combined. This picture doesn't show it well, but there are still light streaks of flour throughout.

I use a mini ice cream scoop to fill my mini muffin tins. (I like anything mini) Stick these puppies into a 375 degree oven for about 13-15 min.

Voila!

Friday, January 15, 2010

Dinner Buns

Now that I have one post under my belt, I decided to make something that I was pretty sure would turn out. Bread. I love bread. I love the smell of the yeast, the feel of the dough in my hands and most importantly...the taste. I originally got this recipe while I was working in the kitchen at a curling rink. Although I never stop trying new recipes for dinner buns, I always come back to this one. It consistently delivers a beautiful, soft and delicious bun. I have also used this recipe to make cinnamon buns with great results. This time around I did take lots of pictures and I hope it helps anyone who is scared to try making bread. Enjoy!

Recipe:
1 1/2 cups warm milk                            2 eggs, slightly beaten
1 1/2 cups warm water                          1/3 cup oil
1/3 cup sugar                                         2 1/4 tsp yeast
1 tsp salt                                                 5-6 cups flour

Method:


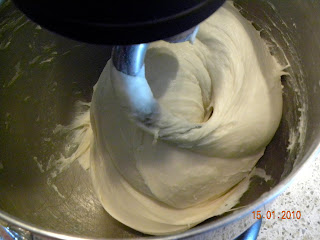
I will first start by saying that the yeast that I use is meant to be mixed in with the flour and not started with the water like most recipe. Began by combining the warm milk and water with the sugar in the bottom of your mixer bowl. I usually give this a little stir just to slightly dissolve the sugar. Add the oil and beaten eggs and give this another quick stir. I then add the flour. This is a really important step actually. When ever I make bread, I always hold back about 1 cup of flour. You just never know how much flour your dough will take on the given day. It is simple to add more flour if needed. Now because of the yeast I use, I sprinkle it over the flour and then with my dough hook in place, I start on a low speed to begin to combine the flour and wet ingredients. When the flour has been moistened,  add the salt and turn your mixer up to about 6 ( I know this is probably not recommended but it's what I do) . You will be able to tell right away if you will need more flour. Add as needed but no more than 1/4 cup at a time. The kneading process will take up to 8 min, even with a mixer. Don't rush the flour. You want your dough to be a little loose and sticky for at least 5 min. Look for the dough to kind of mound in the center of the bowl but still stick to the sides. At about 5 min, the dough should start to pull away from the sides a little and form even more of a ball. If this isn't happening after 5 min....add more flour. Eventually what you are looking for is the dough to completely pull away from the sides of the bowl and almost leave it looking clean.  Rub your hands with about a tbsp of butter, pick up the soft and slightly sticky dough and rub it with butter. Place it back int he bowl. Cover the bowl with a tea towel or plastic wrap. Let the dough rise until almost double. This could take 1 -2 hours. It really depends on the temperature of your room. You can check your dough by sticking your finger into it. If after 5 min of poking it, the hole from your finger has filled, it could probably be given 30 min.  more rising. If after the 5 min, the hole is still there, you are ready to form your buns. I use a scale to weight my dough to ensure a uniform size, but you certainly don't need to do this. Shape the pieces dough into balls. Try to make sure the top of the balls are smooth, as they will bake up exactly as they look now. I use parchment paper on my baking sheets. It guarantees easy clean up! How closely you space your bins is up to you.  If you are looking for buns that you have to tear apart, then keep them quite close...even just touching. If you want individual ones, obviously space them further apart. Once all of the balls are shaped, cover your tray with plastic wrap or a dry tea towel. Allow them to rise again for about an hour. When they have almost doubled  in size, bake them at 350 for about 20-25min. When they are done, they should be nicely browned on the top and a little on the bottom. I like to brush the tops with butter, but it's not necessary. I always move them to a rack to cool. Try to resist eating them immediately, but I bet you can't!